Building on our previous guides — running Next.js on Plesk with Node.js and deploying from GitHub via SSH Deploy Keys — this article completes the picture with a fully automated CI/CD pipeline.
The goal: push to main, and your Next.js application is automatically built and live on your Plesk server — without any manual steps.
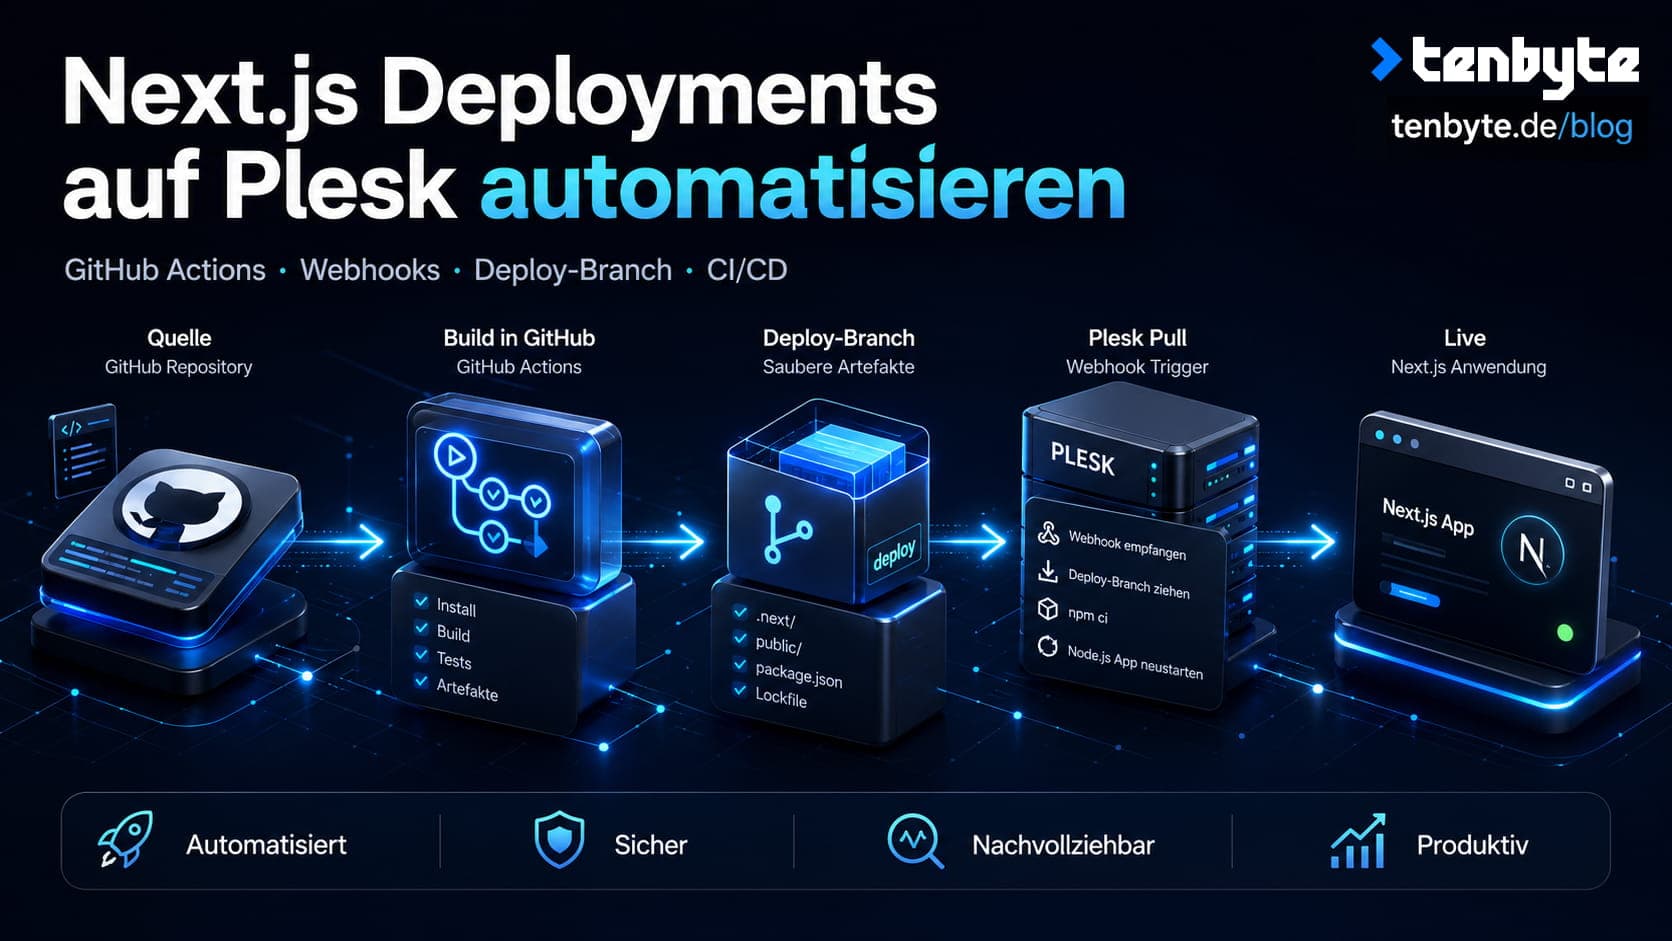
How it works
The approach separates concerns cleanly:
- GitHub Actions handles everything compute-intensive: installing dependencies, running your CI steps, and building the Next.js app in the cloud.
- Plesk only receives the finished build output and serves it.
To avoid shipping unnecessary files to the server (source code, node_modules, dev tooling), the workflow pushes only the built artifacts to a dedicated deploy branch. Plesk watches that branch and pulls automatically when a new commit arrives — triggered by a webhook call at the end of the GitHub Actions run.
Prerequisites
- A Next.js application hosted on Plesk with Node.js enabled (see this guide)
- The GitHub repository connected to Plesk via SSH Deploy Key (see this guide)
- GitHub repository with Actions enabled
- Admin access to both GitHub and Plesk
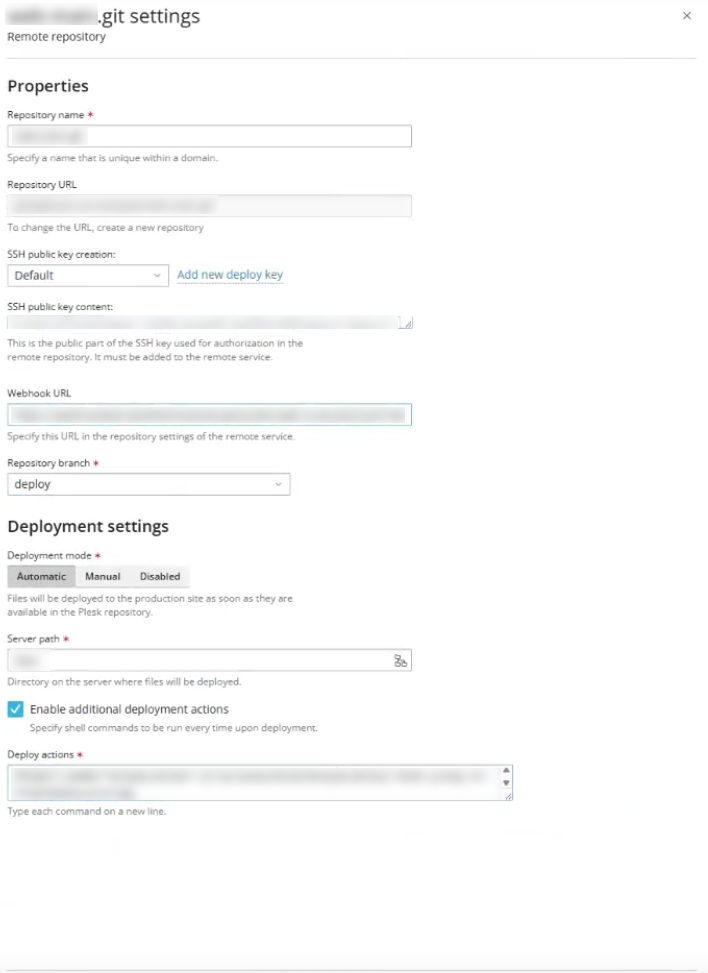
Step 1: Configure Plesk to watch the deploy branch
In Plesk, open Websites & Domains → Git for your domain and configure the repository settings:
- Repository URL: your SSH repository URL (e.g.
git@github.com:your-org/your-repo.git) - Repository branch:
deploy - Deployment mode:
Automatic - Server path: the directory where your app lives on the server
Make note of the Webhook URL shown in this screen — you will need it in Step 3. Keep it secret; anyone with this URL can trigger a deployment.
The settings should look like this — note the branch set to deploy and deployment mode set to Automatic. Copy the Webhook URL from this screen before closing it:
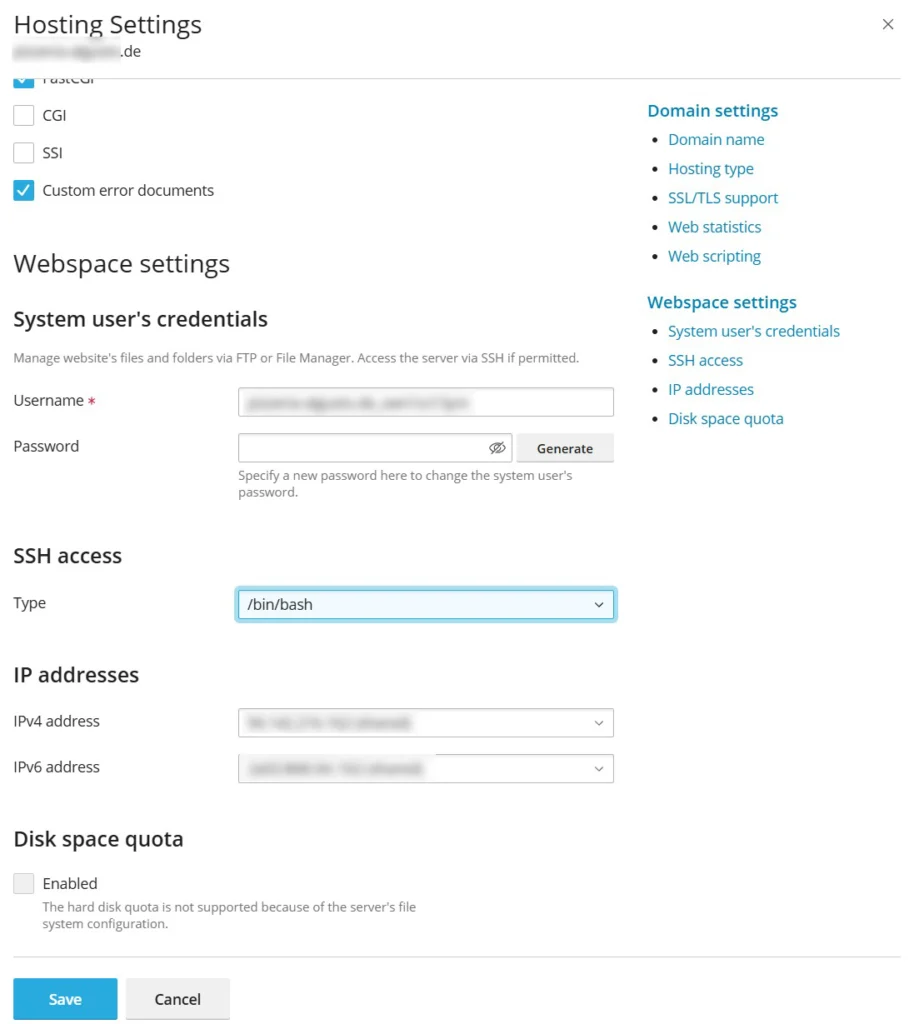
SSH access
For the deploy actions to work, the system user for your domain needs shell access. Go to Websites & Domains → Hosting Settings and set SSH access to /bin/bash. Without this, Plesk cannot execute shell commands after pulling the new code.
In the SSH access dropdown, select /bin/bash — any other option will prevent the deploy actions from running:
Deploy actions in Plesk
With Enable additional deployment actions checked, Plesk runs shell commands after every pull. This is where you install production dependencies and restart your Node.js process so the new build takes effect.
cd /var/www/vhosts/yourdomain.de/yourapp
mkdir -p tmp
rm -f tmp/deploy-error.log
PATH="/opt/plesk/node/24/bin:/usr/local/bin:/usr/bin:/bin:/usr/local/sbin:/usr/sbin:/sbin" \
  /opt/plesk/node/24/bin/npm ci > tmp/deploy-error.log 2>&1 \
&& touch tmp/restart.txt \
&& rm -f tmp/deploy-error.log
A few things worth noting:
npm ciinstalls dependencies exactly as defined inpackage-lock.json. Since thedeploybranch shipspackage.jsonandpackage-lock.jsonbut notnode_modules, this step runs on the server after every pull.touch tmp/restart.txtis Plesk’s file-based Node.js restart trigger. When this file appears, Plesk detects it and restarts the Node.js process automatically — no CLI command required.- The deploy error log is written first, then deleted on success. If
npm cifails, the log stays attmp/deploy-error.logfor debugging.
Note: Adjust the Node.js version path (
/opt/plesk/node/24/bin) to match the version configured in your Plesk Node.js panel.
Step 2: Add GitHub Secrets
Go to your GitHub repository → Settings → Secrets and variables → Actions and add at minimum:
| Secret name | Value |
|---|---|
PLESK_WEBHOOK_URL | The Webhook URL from the Plesk Git settings panel |
Add any environment variables your Next.js build requires as secrets here as well (e.g. NEXT_PUBLIC_APP_URL or any API keys needed at build time).
Step 3: Create the GitHub Actions workflow
Create the file .github/workflows/deploy.yml in your repository. The workflow structure looks like this:
name: Deploy

on:
  push:
    branches: [main]
  workflow_dispatch:

permissions:
  contents: write

jobs:
  deploy:
    runs-on: ubuntu-latest

    steps:
      - uses: actions/checkout@de0fac2e4500dabe0009e67214ff5f5447ce83dd # v6.0.2
      - uses: actions/setup-node@48b55a011bda9f5d6aeb4c2d9c7362e8dae4041e # v6.4.0
        with:
          node-version: '22'
          cache: 'npm'

      # Your CI steps go here
      # Examples: npm ci, npm test, npm run lint, npm audit, etc.

      - name: Build
        run: npm run build
        env:
          NEXT_PUBLIC_APP_URL: ${{ secrets.NEXT_PUBLIC_APP_URL }}
          # Add any other build-time env vars here

      - name: Push deploy branch
        run: |
          # see snippet below

      - name: Trigger Plesk webhook
        run: curl -fsS -X POST "${{ secrets.PLESK_WEBHOOK_URL }}"
On pinning action versions: You might wonder why the actions are referenced with a long commit hash instead of a simple tag like
@v4. The reason is security. Tags in GitHub can be moved — in theory, anyone with access to theactions/checkoutrepository could point thev4tag at a completely different commit tomorrow. Your workflow would then silently run different code than before. A commit hash cannot be moved. It always refers to exactly one specific state of the code, permanently. The comment# v6.0.2next to it is just for human readability so you still know which version it corresponds to. The hashes above were current at the time of writing — check the actions/checkout and actions/setup-node repositories for the latest recommended hashes when setting this up.
The key piece: pushing a clean deploy branch
This is the most important part of the workflow. Instead of pushing source code to the server and building there, GitHub Actions builds the app and pushes only the finished artifacts to a separate deploy branch. Plesk pulls from that branch, never from main.
Here is the full snippet for the Push deploy branch step:
git config user.name "github-actions[bot]"
git config user.email "github-actions[bot]@users.noreply.github.com"

# Save the files the server needs before clearing everything
cp -r public "$RUNNER_TEMP/deploy-public"
cp package.json package-lock.json next.config.ts "$RUNNER_TEMP/"

# Create a fresh orphan branch with no history
git checkout --orphan deploy-build
git rm -rf . --quiet

# Remove remaining untracked files except .next/ and .git/
find . -maxdepth 1 -mindepth 1 ! -name '.git' ! -name '.next' -exec rm -rf {} +

# Restore only what the server needs
cp -r "$RUNNER_TEMP/deploy-public" ./public
cp "$RUNNER_TEMP/package.json" "$RUNNER_TEMP/package-lock.json" "$RUNNER_TEMP/next.config.ts" .

# Minimal .gitignore — .next/ is intentionally NOT excluded here
printf 'node_modules/\n' > .gitignore

# Commit and push (force-add .next/ since it would normally be gitignored)
git add -f .next/ public/ package.json package-lock.json next.config.ts .gitignore
git commit -m "Deploy ${GITHUB_SHA::8} at $(date -u '+%Y-%m-%d %H:%M UTC')"
git push origin HEAD:deploy --force
What this does step by step:
- Creates a fresh orphan branch with no history — the
deploybranch only ever contains one commit: the latest build - Clears everything from the working directory except
.next/(the build output) and.git/ - Adds back only what the server actually needs to run:
.next/,public/,package.json,package-lock.json,next.config.ts - Force-adds
.next/— it is normally listed in.gitignoreand would be skipped, but here it is the entire point - Force-pushes to the
deploybranch
The result: Plesk receives a clean, ready-to-run artifact. It never has to run npm run build itself. The server only runs npm ci to install production dependencies, then restarts.
You may need to adjust which files get copied depending on your project structure. If you have additional directories needed at runtime, add them to the copy and git add steps accordingly.
How the full flow looks in practice
Once everything is set up, this is what a completed pipeline run looks like in GitHub Actions. Each step runs in sequence — if any step fails, the pipeline stops there and nothing gets deployed:
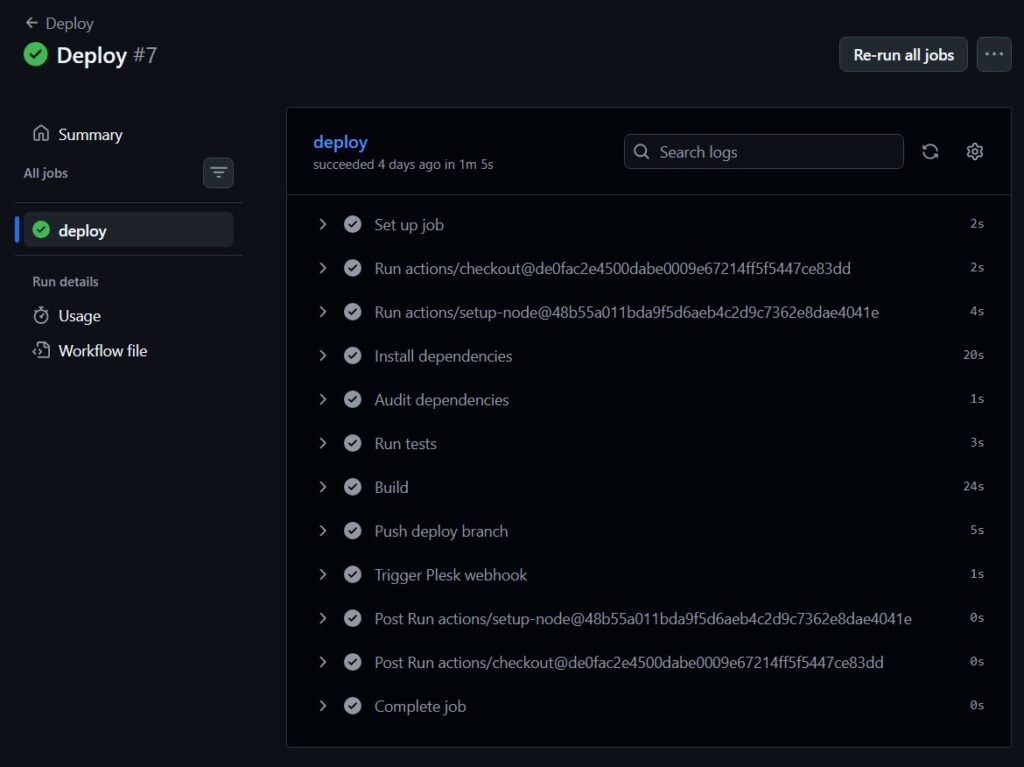
The steps map directly to what was configured: checkout, Node.js setup, your CI steps, the build, pushing the deploy branch, and finally triggering the Plesk webhook. The entire run typically finishes in around 60–90 seconds, with the build step taking the longest. The webhook trigger itself takes about 1 second — after that, Plesk handles the rest on the server side.
Quick checklist
.github/workflows/deploy.ymlcreated and committed tomainPLESK_WEBHOOK_URLsecret added to GitHub- Any build-time environment variables added as GitHub Secrets
- Plesk Git settings: branch set to
deploy, deployment mode set toAutomatic - Plesk deploy actions configured with correct paths and Node.js version
- SSH access set to
/bin/bashfor the domain system user in Plesk Hosting Settings - First workflow run triggered manually via
workflow_dispatchto verify everything works end to end
Troubleshooting
Build succeeds but Plesk does not update
Check that the Webhook URL in GitHub Secrets matches exactly what Plesk shows. Also verify that deployment mode in Plesk is set to Automatic and the branch is deploy.
Node.js app does not restart after deployment
Verify the path in your deploy actions script matches the actual Node.js version installed (/opt/plesk/node/24/bin). Check the deploy error log at tmp/deploy-error.log in your app directory.
.next/ folder not appearing on server
The git add -f .next/ step explicitly overrides .gitignore. If it is still missing, check that the build step completed successfully and that the deploy branch actually contains a .next/ folder before the webhook fires.
Plesk deploy actions not running
Make sure SSH access is set to /bin/bash in Hosting Settings. Without shell access, Plesk silently skips the deploy actions script.
⚠️ Please note: We do our best to keep things accurate, but we can’t guarantee perfection. Use at your own risk. If you encounter errors, feel free to open an issue via GitHub.
If this works for you we would love to see your support on Instagram, LinkedIn or GitHub ❤️