
Plesk provides a powerful extension platform, but getting started with it can be more difficult than expected.
The basic file structure is documented, but a real extension also needs navigation, controllers, views, access control, localization, packaging, and a practical development workflow. Developers must also understand which Plesk APIs are available and how an extension should interact with the underlying Linux system.
To make this easier, we have published Tenbyte Sample for Plesk: a small, open-source extension that provides read-only server diagnostics while also serving as a clean foundation for developing your own Plesk extensions.
The complete source code is available on GitHub:
github.com/tenbyte/plesk-ext-sample
The project is licensed under the Apache License 2.0 and can be used, modified, and extended for your own projects.
What the extension does
Tenbyte Sample adds a small diagnostic area to the Plesk administrator interface.
It collects useful information about the server and the installed Plesk environment without changing services, configuration files, domains, or subscriptions.
The current version includes:
- A read-only server dashboard
- Linux system and resource information
- Service status checks
- An aggregated Plesk inventory
- A domain inspector
- Text and JSON system reports
- Downloadable JSON reports
- English and German localization
- Role-based administrator access
- An optional isolated customer and reseller demo page
The extension currently requires Plesk Obsidian 18.0.79 or newer on Linux.
Why we built it
A minimal Plesk extension can be created with only a few files. That is enough to display a basic page, but it does not answer many of the questions that appear as soon as a project becomes more serious:
- How should multiple pages be registered?
- How can access be restricted to selected administrators?
- How should customer and reseller views be separated?
- Where should reusable application logic be placed?
- How can Plesk data be collected safely?
- How do you deploy changes repeatedly during development?
- How do you create a clean installation package?
- Which files should never be included in the final ZIP archive?
Tenbyte Sample provides practical examples for all of these areas without turning the repository into a large framework.
The project is intentionally small enough to understand, but complete enough to use as the starting point for an actual extension.
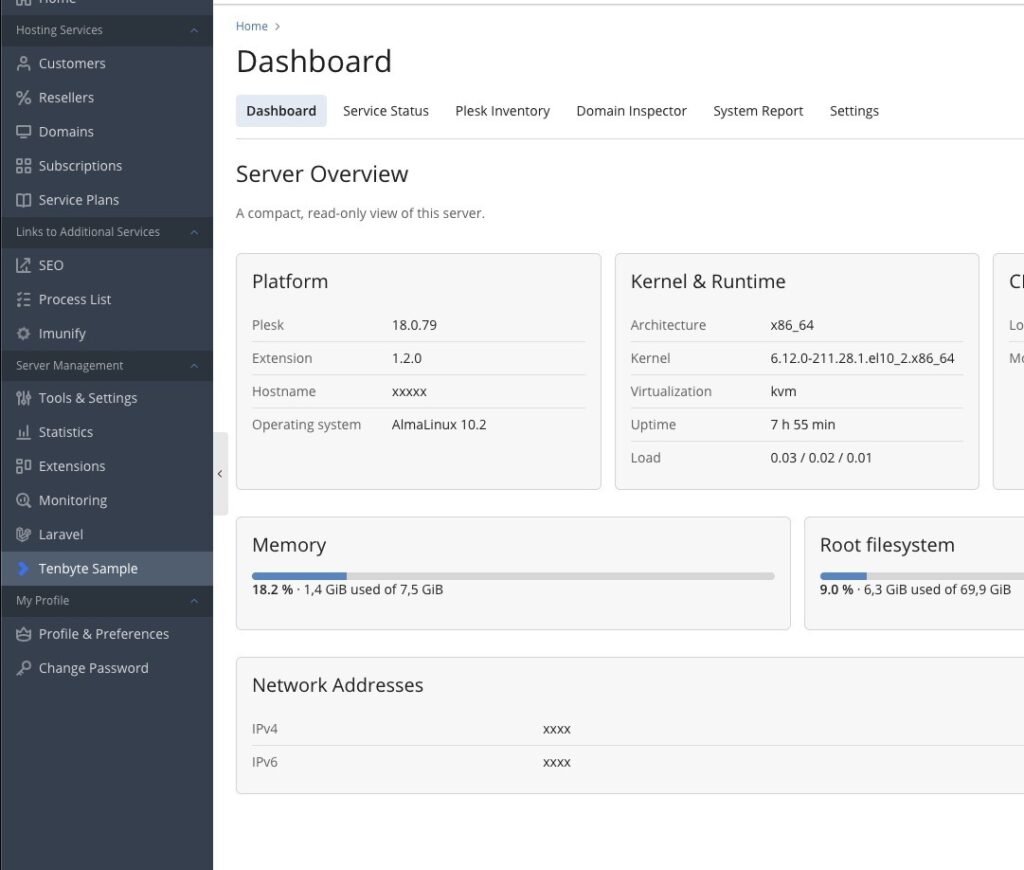
The server dashboard
The main dashboard provides a compact overview of the system running Plesk.
It collects:
- Hostname
- Plesk version
- Extension version
- Operating system and version
- CPU architecture
- Kernel name, release, and version
- Virtualization type
- System uptime
- Load averages for 1, 5, and 15 minutes
- CPU model and logical CPU count
- Memory usage
- Root filesystem usage
- Network addresses
The information is collected locally through PHP, the Plesk SDK, and a limited set of fixed Linux commands.
No values from browser input are passed into shell commands.
The dashboard is therefore useful for quickly checking the basic condition and configuration of a server without opening an SSH session.
Service status checks
The service status page checks common services used by a Plesk installation.
This includes:
- Plesk Panel services
- nginx
- Apache
- MariaDB or MySQL
- PHP-FPM
- Postfix
- Dovecot
The extension first identifies the service units installed on the system. It then matches them against known service names and reads their current state.
This is important because service names can differ between supported Linux distributions. Apache, for example, may be available as either httpd.service or apache2.service.
PHP-FPM is even more dynamic because several Plesk PHP handlers can be installed at the same time.
The extension accounts for these differences and summarizes the detected units into a simple status view.
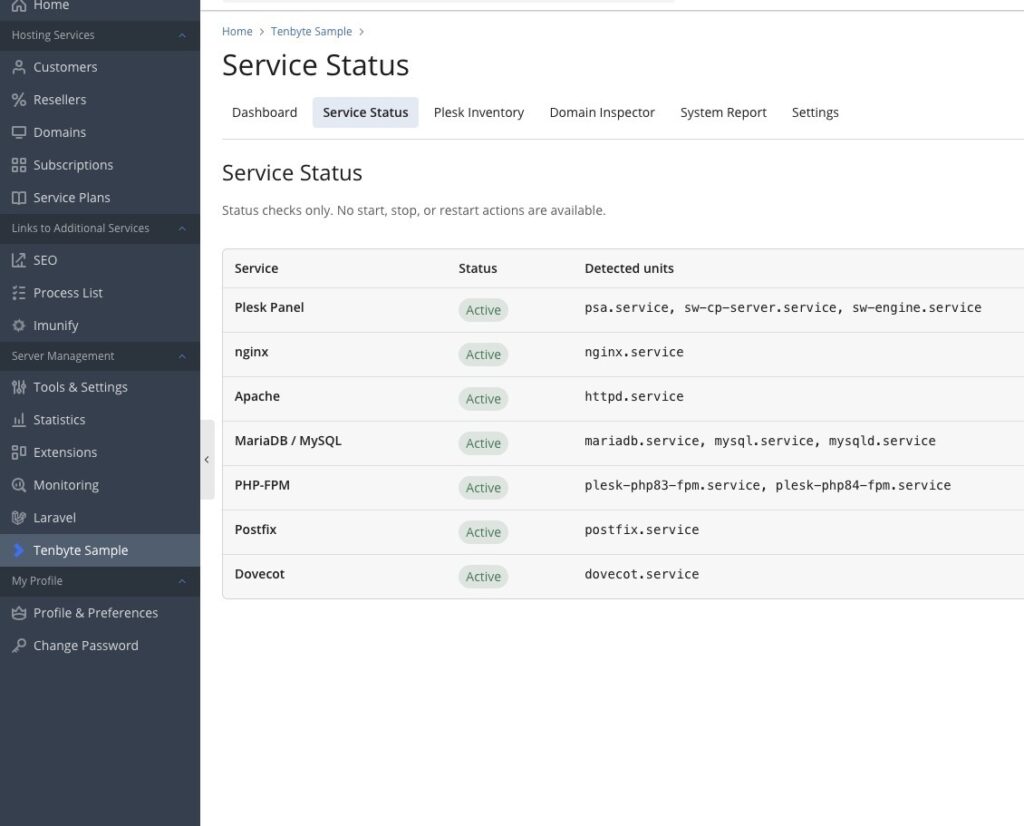
The page is deliberately read-only. It does not provide buttons for starting, stopping, restarting, or reconfiguring services.
That makes it suitable as a diagnostic example without introducing unnecessary operational risk.
Aggregated Plesk inventory
The inventory page provides a quick overview of the objects managed by the server.
It displays the number of:
- Domains
- Subdomains
- Subscriptions
- Customers
- Mail accounts
- Installed PHP versions
The extension primarily uses the Plesk SDK to retrieve this information.
For example, domains and subscriptions are collected through Plesk domain objects, while customer accounts are filtered through the Plesk client API.
The installed PHP versions are obtained through the Plesk PHP handler CLI and then normalized into a unique, sorted list.
This demonstrates how an extension can combine different Plesk interfaces while keeping the presentation logic separate from the collection logic.
Domain Inspector
The Domain Inspector allows an administrator to enter a domain name and view its corresponding Plesk configuration.
For an existing domain, the extension can display:
- Domain name
- Associated subscription
- Customer or owner
- Document root
- PHP version and handler
- Hosting status
- Assigned IP addresses
- SSL certificate status
- SSL certificate name
- SSL certificate expiration date
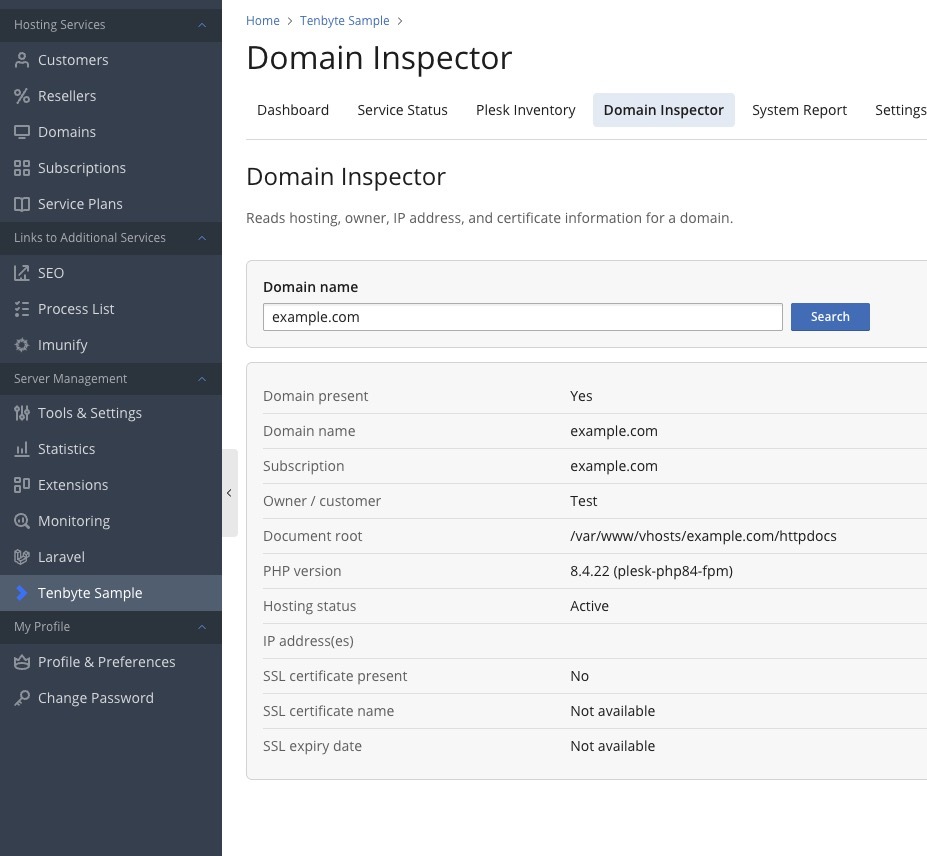
Before processing the request, the entered value is validated as a domain name.
The extension does not perform arbitrary DNS queries and does not pass the entered domain into a shell command. It only attempts to find the corresponding domain through the Plesk API.
If the domain is not present on the server, the result simply reports that no matching Plesk domain exists.
This is a useful example of how user input can be handled without exposing a generic command execution path.
Text and JSON system reports
The report page combines the collected information into a structured system report.
The report contains:
- Generation timestamp
- Operating system information
- Architecture and kernel information
- Virtualization type
- Uptime
- Load averages
- CPU information
- Memory usage
- Storage usage
- Network addresses
- Plesk and extension versions
- Service states
- Plesk inventory
Two formats are available.
Text report
The text report is intended for copying into tickets, internal documentation, or support requests.
It uses a readable line-based format that can be pasted into most support systems without additional formatting.
JSON report
The JSON version contains the same information as structured data.
It can be:
- Viewed directly in the extension
- Copied into another application
- Downloaded as a
.jsonfile - Processed by scripts or internal tooling
- Stored as part of a server inventory workflow
The download response explicitly uses the JSON content type and adds X-Content-Type-Options: nosniff.
A generated file uses a timestamped filename similar to:
tenbyte-system-report-2026-07-01-143000.jsonThe extension does not automatically upload or transmit these reports anywhere.
Role-based access
Server diagnostic information should not automatically be visible to every Plesk user.
Tenbyte Sample therefore separates administrator functionality from the optional customer-facing demonstration page.
Primary administrator
The primary Plesk administrator always has access to the extension and its settings.
Only the primary administrator can configure:
- Whether access should be restricted
- Which additional administrator accounts may use the extension
- Whether the customer and reseller demo page should be enabled
Additional administrator accounts
By default, administrator accounts can access the diagnostic pages.
When restricted access is enabled, the primary administrator can explicitly select which additional administrator logins should retain access.
The restriction is applied in several places:
- The navigation entries
- The custom Plesk button
- The controller itself
Hiding a navigation element alone is not access control. For that reason, every administrator request is validated again inside the controller.
An unauthorized request receives an HTTP 403 response.
Customers and resellers
Customers and resellers never receive access to the diagnostic controller.
An optional demo page can be enabled separately to demonstrate how a Plesk extension can integrate into customer and reseller areas.
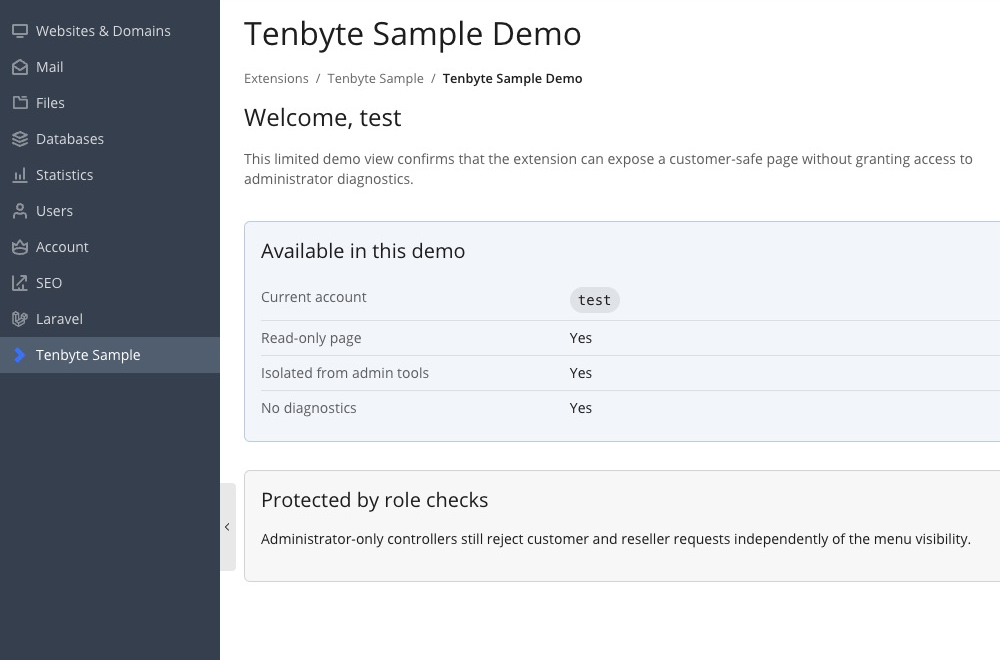
This page is intentionally isolated. It does not load:
- Server diagnostics
- Service information
- Inventory data
- Domain information
- Reports
- Extension settings
It is only an example of role-based navigation and frontend integration.
Project structure
The repository follows the standard structure expected by the Plesk extension platform:
plesk-ext-sample/
├── htdocs/
│   ├── css/
│   ├── images/
│   ├── js/
│   └── index.php
├── plib/
│   ├── controllers/
│   ├── hooks/
│   ├── library/
│   ├── resources/
│   │   └── locales/
│   └── views/
│       └── scripts/
├── scripts/
│   └── common.sh
├── .env.example
├── DESCRIPTION.md
├── LICENSE
├── README.md
├── deploy.sh
├── meta.xml
├── package.sh
└── setup-dev.sh
meta.xml
The meta.xml file contains the extension metadata used by Plesk.
This includes:
- Extension ID
- Display name
- Description
- Category
- Supported operating system
- Version
- Vendor
- Project URL
- Minimum Plesk version
For this project, the extension ID is:
tenbyte-sample
When using the project as a base for another extension, this ID must be changed consistently throughout the codebase.
Controllers
The controllers handle requests and prepare data for the views.
IndexController.php contains the administrator actions:
- Dashboard
- Services
- Inventory
- Domain Inspector
- Reports
- Settings
- JSON download
UserController.php handles the isolated customer and reseller demo page.
Hooks
Plesk hooks register the extension in the panel interface.
The project contains examples for:
- Administrator navigation
- Nested extension pages
- Customer and reseller navigation
- Custom buttons
- Conditional visibility
These hooks use the same access-control class as the controllers so that navigation visibility and actual permissions remain consistent.
Library classes
Reusable application logic is kept outside the controllers.
The two central classes are:
Modules_TenbyteSample_AccessControl
Modules_TenbyteSample_Collector
AccessControl handles administrator restrictions, primary administrator detection, and the optional user demo.
Collector retrieves system, service, Plesk, domain, and report information.
Keeping this logic separate makes the controllers easier to understand and allows the same information to be reused in different output formats.
Views and frontend assets
The administrator and customer interfaces use Plesk-compatible PHP view scripts.
Custom CSS and JavaScript are stored below htdocs/, while translated strings are stored in the locale resources.
The frontend does not require an additional JavaScript framework or frontend build process.
English and German localization
All relevant interface labels are stored in locale files instead of being hard-coded throughout the views.
The extension currently provides:
- English
- German
Plesk selects the appropriate translation based on the current panel language.
This is particularly important for extensions that may be installed across multiple customer environments.
Additional languages can be added by creating another locale resource with the same message keys.
Development requirements
The included development workflow is designed for a local development machine and a separate Plesk development server.
You need:
- Plesk Obsidian 18.0.79 or newer on Linux
- Bash
- SSH
rsynczipunzip- Root SSH access to the development server
- Optionally,
expectfor a local password-based fallback
SSH key authentication is strongly recommended.
The password fallback is intended only for temporary development systems that do not accept an SSH key yet.
Setting up the development environment
Clone the repository:
git clone https://github.com/tenbyte/plesk-ext-sample.git
cd plesk-ext-sample
Create the local configuration file:
cp .env.example .envThe recommended configuration uses an existing SSH alias:
PLESK_SSH_TARGET=plesk-dev
PLESK_URL=https://plesk.example.test:8443
The alias can be defined in ~/.ssh/config:
Host plesk-dev
    HostName 192.0.2.10
    User root
    IdentityFile ~/.ssh/id_ed25519
Alternatively, configure the address and username separately:
PLESK_IP=192.0.2.10
PLESK_VM_USERNAME=root
PLESK_URL=https://plesk.example.test:8443
Initial development installation
Run:
./setup-dev.shThe setup script performs several checks before creating anything.
It verifies that:
- SSH connectivity works
- The remote user is root
- Plesk is installed
- The expected Plesk version is available
- The required Plesk extension CLI commands exist
- The expected Plesk module directories are present
The script then creates and registers the development extension through the Plesk CLI.
A marker file is placed inside the extension’s Plesk data directory. This marker identifies the installation as managed by the repository’s development workflow.
This prevents the script from silently overwriting an existing extension with the same ID that was installed through another process.
If an unmanaged installation named tenbyte-sample already exists, the script stops instead of replacing it.
Deploying changes
After the initial setup, changes can be deployed with:
./deploy.shThe deployment process:
- Loads the local
.envconfiguration - Checks SSH connectivity
- Runs a local PHP syntax check when PHP is available
- Performs the remote Plesk preflight checks
- Verifies the development marker
- Verifies the remote extension structure
- Confirms that the extension is registered
- Synchronizes
plib,htdocs, andmeta.xmlusingrsync - Runs PHP syntax checks using Plesk’s PHP binary
- Validates the extension ID
- Registers the updated extension
- Reports successful completion
Because the extension files are synchronized directly into the Plesk module directories, a browser reload is normally enough to see the changes.
This is considerably faster than rebuilding and manually uploading a ZIP archive after every small modification.
The deployment script uses rsync --delete, so files removed locally are also removed from the managed remote extension directories.
For that reason, the marker and ownership checks are important safeguards.
Building an installable ZIP package
To create a distributable extension package, run:
./package.shThe script reads the current version from meta.xml and creates an archive inside:
dist/For version 1.2.0, the resulting filename is:
dist/tenbyte-sample-1.2.0.zipThe package contains only:
meta.xml
DESCRIPTION.md
LICENSE
htdocs/
plib/
Local development files are not included.
The packaging script also validates the finished archive and rejects unexpected entries such as:
.envfiles- Git metadata
- macOS
.DS_Storefiles - AppleDouble
._files - Other files outside the permitted extension structure
The resulting ZIP can then be installed using Plesk’s extension installation interface.
Safety model
This project is a diagnostic sample, not a server management interface.
Several limitations are deliberate:
- No service start action
- No service stop action
- No service restart action
- No configuration changes
- No domain changes
- No subscription changes
- No public API
- No telemetry
- No external application dependencies
- No shell commands constructed from user input
Where the extension executes a local command, it uses a predefined executable and predefined argument structure.
The Domain Inspector validates its input and accesses domains through the Plesk API instead of passing the domain name into a system command.
Settings are stored using Plesk’s extension settings API.
Sensitive administrator pages are protected both through navigation visibility and controller-level authorization.
These restrictions make the project a safer starting point than an example that immediately introduces write operations or arbitrary shell execution.
That does not mean every modification based on the project is automatically secure.
Once write operations, external APIs, background jobs, or user-controlled command arguments are introduced, the security model must be reviewed again.
Using the repository as a base for your own extension
The project can be used in two ways.
Learning resource
You can study individual parts of the implementation:
- Extension metadata
- Plesk controllers
- View scripts
- Custom navigation
- Custom buttons
- Localization
- Access restrictions
- Plesk SDK usage
- CLI integration
- Packaging
- Development deployment
Project template
You can also fork or clone the repository and replace the sample functionality with your own application.
At minimum, review and rename:
- The extension ID
- PHP class prefixes
- Extension name
- Descriptions
- Vendor information
- Package filename
- Remote development paths
- Translation keys
- Icons and branding
The current code uses the extension ID in multiple files and scripts. Changing only meta.xml is not sufficient.
Use a project-wide search for:
tenbyte-sample
TenbyteSample
Tenbyte Sample
After renaming, test the project on a disposable Plesk development server before installing it in a production environment.
What this sample intentionally does not include
The repository is meant to remain understandable.
It therefore does not include:
- A database migration system
- Scheduled tasks
- Background workers
- Remote APIs
- Webhook handling
- Composer dependencies
- A JavaScript framework
- A frontend build pipeline
- Service management
- Automatic update distribution
- Licensing or commercial activation logic
These can all be added to a Plesk extension, but including them in the initial sample would make the basic architecture harder to follow.
The current project focuses on the foundation: structure, navigation, permissions, safe data collection, deployment, and packaging.
Repository and contributions
The complete project is available here:
Tenbyte Sample for Plesk on GitHub
Issues and pull requests are welcome.
The source code is released under the Apache License 2.0.
Please note that this is an independent sample extension. It is not affiliated with, endorsed by, sponsored by, or maintained by WebPros International GmbH.
Plesk and Plesk Obsidian are trademarks or registered trademarks of WebPros International GmbH. Their names are used only to describe compatibility with the Plesk extension platform.
Conclusion
Developing a Plesk extension involves more than creating a PHP page inside the panel.
A maintainable extension needs a clear structure, reliable access control, safe interaction with the server, localization, a repeatable development workflow, and a clean packaging process.
Tenbyte Sample provides these components in a compact open-source project.
It is useful as a diagnostic tool in its current form, but its main purpose is to provide a practical and understandable foundation for developers building their own Plesk integrations.
⚠️ Please note: We do our best to keep our projects and articles accurate, but we cannot guarantee that every setup will behave identically across all Plesk versions and Linux distributions. Test extensions on a separate development server before using them in production.
If you encounter a problem or have an improvement, feel free to open an issue or pull request on GitHub.
If this project is useful to you, we would appreciate your support on Instagram, LinkedIn or GitHub ❤️